
Introduction to Chocolate Thumbprint Cookies
When it comes to home baking, there’s something purely magical about the warm aroma of baking cookies that fills the kitchen. One treat that’s consistently delightful is the classic Chocolate Thumbprint Cookies. These delectable little bites combine a rich, chocolatey cookie base with a luscious filling, creating an irresistible balance of textures and flavors.
Why you’ll love Chocolate Thumbprint Cookies
Imagine sinking your teeth into a soft, chewy cookie with a slightly crisp edge, only to discover a smooth chocolate ganache waiting at its center. Sounds heavenly, doesn’t it? Here are a few reasons why Chocolate Thumbprint Cookies will quickly become a favorite in your baking repertoire:
- Easy to Make: Even if you’re still sharpening your baking skills, this recipe is straightforward. A few essential ingredients, minimal equipment, and you’ll be on your way to cookie bliss.
- Customizable: While the classic chocolate filling is a showstopper, you can easily switch it up. Use fruit jams, peanut butter, or even cookie butter if you want to surprise your taste buds! This adaptability makes it perfect for any occasion.
- Great for Sharing: Whether you’re planning a cozy gathering with friends or looking for the perfect host gift, these cookies are ideal for sharing. Who wouldn’t love a box filled with charming, delicious cookies?
- Impressive Presentation: Their unique shape and glossy filling make them visually striking. You’ll feel like a professional baker when you present these beauties!
Did you know that cookies have a historical significance in baking? Ancient bakers created these delightful treats as a way to celebrate special occasions. You can learn more about the history of cookies at The Cookie History.
Baking Chocolate Thumbprint Cookies is not just about satisfying your sweet tooth; it’s an opportunity to create memories, unleash your creativity, and, let’s be honest, take a break from the hustle and bustle of daily life. So, whether you’re indulging solo with a warm cup of coffee or sharing with loved ones, these cookies are sure to charm everyone around.
Take a moment to gather your ingredients, and let’s dive into this delightful recipe that’s destined to sweeten your day!
Ingredients for Chocolate Thumbprint Cookies
Creating the perfect batch of Chocolate Thumbprint Cookies starts with sourcing the right ingredients. Here’s what you’ll need to ensure your cookies come out delicious and delightful!
Pantry Essentials
- Unsalted Butter: 1 cup, softened—is key for that rich, creamy texture.
- Granulated Sugar: ¾ cup, adds just the right sweetness.
- Brown Sugar: ½ cup, to bring in a hint of molasses flavor.
- Vanilla Extract: 1 teaspoon, enhances all the other flavors beautifully.
Dry Ingredients
- All-Purpose Flour: 2 cups for structure and chewiness.
- Cocoa Powder: ½ cup, this is what gives your cookies that deep chocolate flavor.
- Baking Powder: 1 teaspoon to help them rise slightly.
- Salt: ½ teaspoon to balance the sweetness.
For the Filling
- Chocolate Ganache or Jam: Choose your favorite flavor; classic chocolate or fruity preserves works wonders. How about trying raspberry or strawberry for a unique twist?
When picking your ingredients, consider exploring options at your local farmers’ market for fresh and organic produce. You might just find a new favorite jam! For detailed guides on ingredient usage, check out King Arthur Baking.
By collecting these ingredients, you’re well on your way to whipping up a batch of Chocolate Thumbprint Cookies that friends and family will rave about!
Preparing Chocolate Thumbprint Cookies
Making Chocolate Thumbprint Cookies is an enriching experience that brings out your inner baker, and there’s nothing quite like the aroma of fresh cookies wafting through your home. Trust me, it’s a joyful journey that combines simple techniques with delicious results! Let’s break it down step by step.
Creaming the butter and sugar
To kick off your delightful cookie-making adventure, you’ll want to start with the creaming method. In a large mixing bowl, combine softened butter and granulated sugar. The goal here is to incorporate air into the mixture, giving your cookies that light and tender texture. Beat them together with a hand mixer or stand mixer on medium speed for about 2-3 minutes until the mixture is light and fluffy. You can really feel the change in texture here – it becomes almost like a creamy dream!
Pro tip: Make sure your butter is at room temperature; this helps achieve that perfect consistency.
Mixing wet and dry ingredients
Now, it’s time to introduce your wet and dry ingredients. In a separate bowl, whisk together your all-purpose flour, cocoa powder, baking powder, and a pinch of salt. This step is crucial because it ensures that the leavening agents are evenly distributed, leading to evenly baked cookies.
Gradually add this dry mix to your creamed butter and sugar, alternating with your eggs and vanilla extract. Mix until just combined; you don’t want to overmix it, as this can lead to tough cookies.
If you wish to learn more about the science behind creaming and why it matters, check out this baking guide from King Arthur Baking.
Forming the cookie dough
Now that your batter is ready, it’s time to form it into cookie dough! Use a cookie scoop or a tablespoon to portion out the dough. Roll each portion into a ball between your palms. Remember, the size of your balls will determine how big your cookies turn out, so aim for about one-inch rounds.
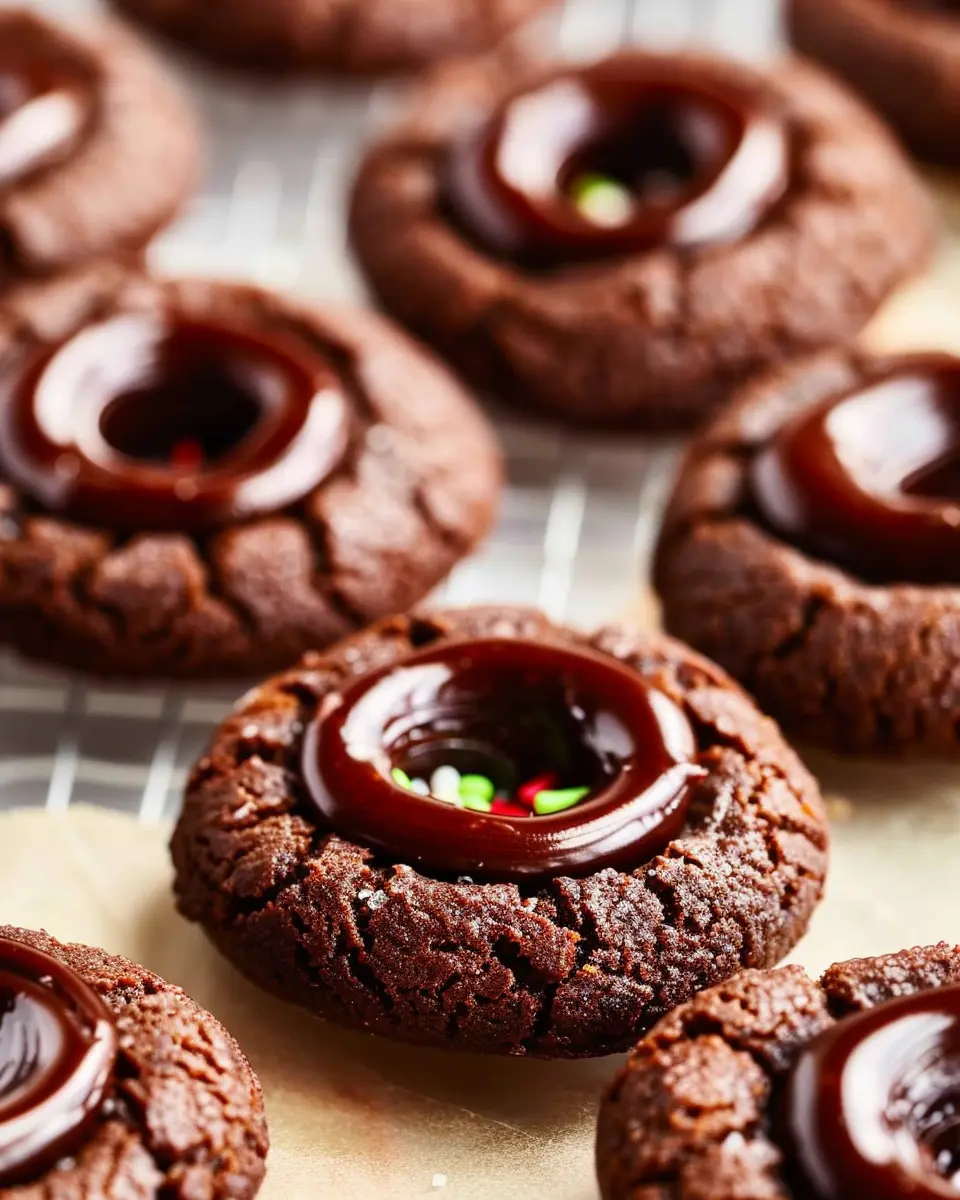
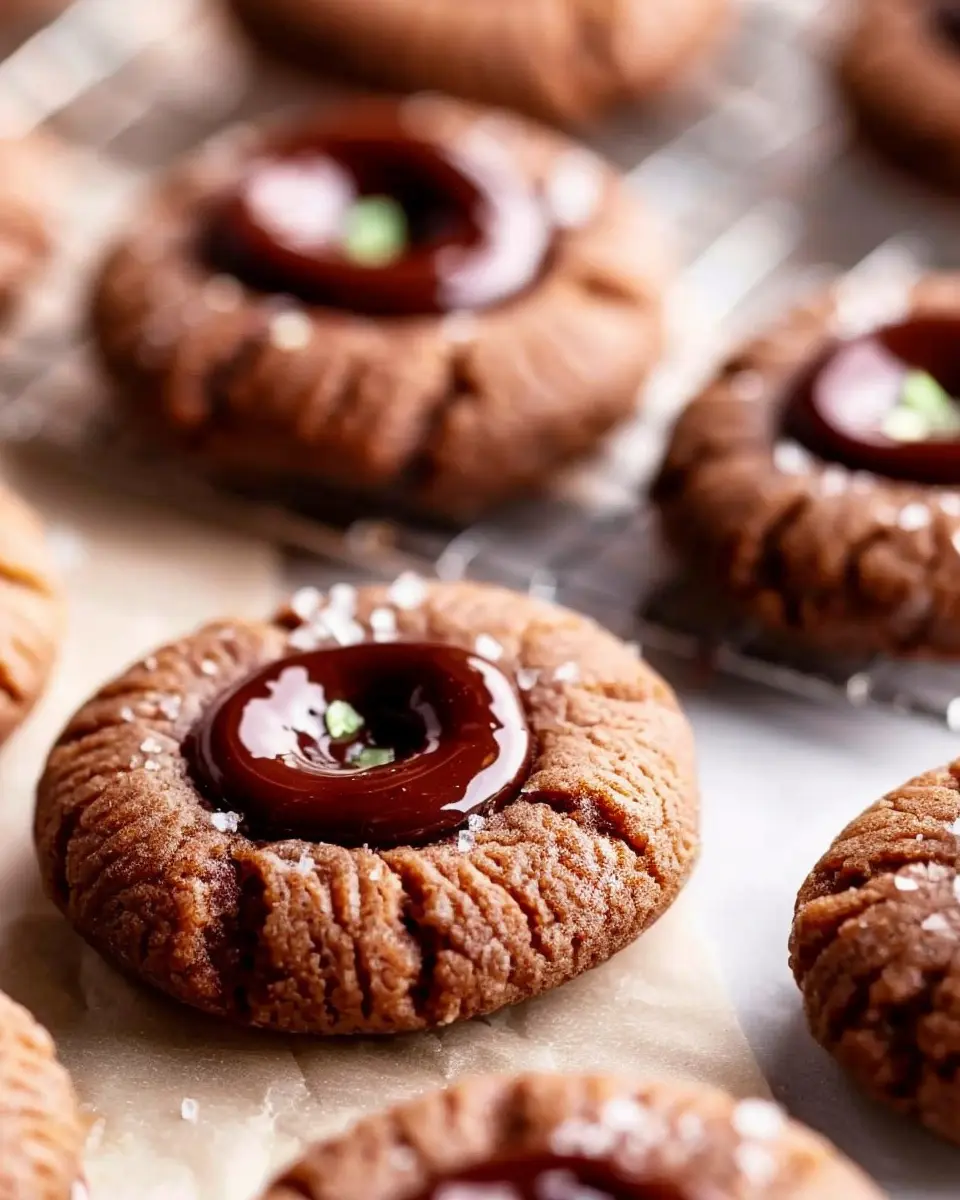
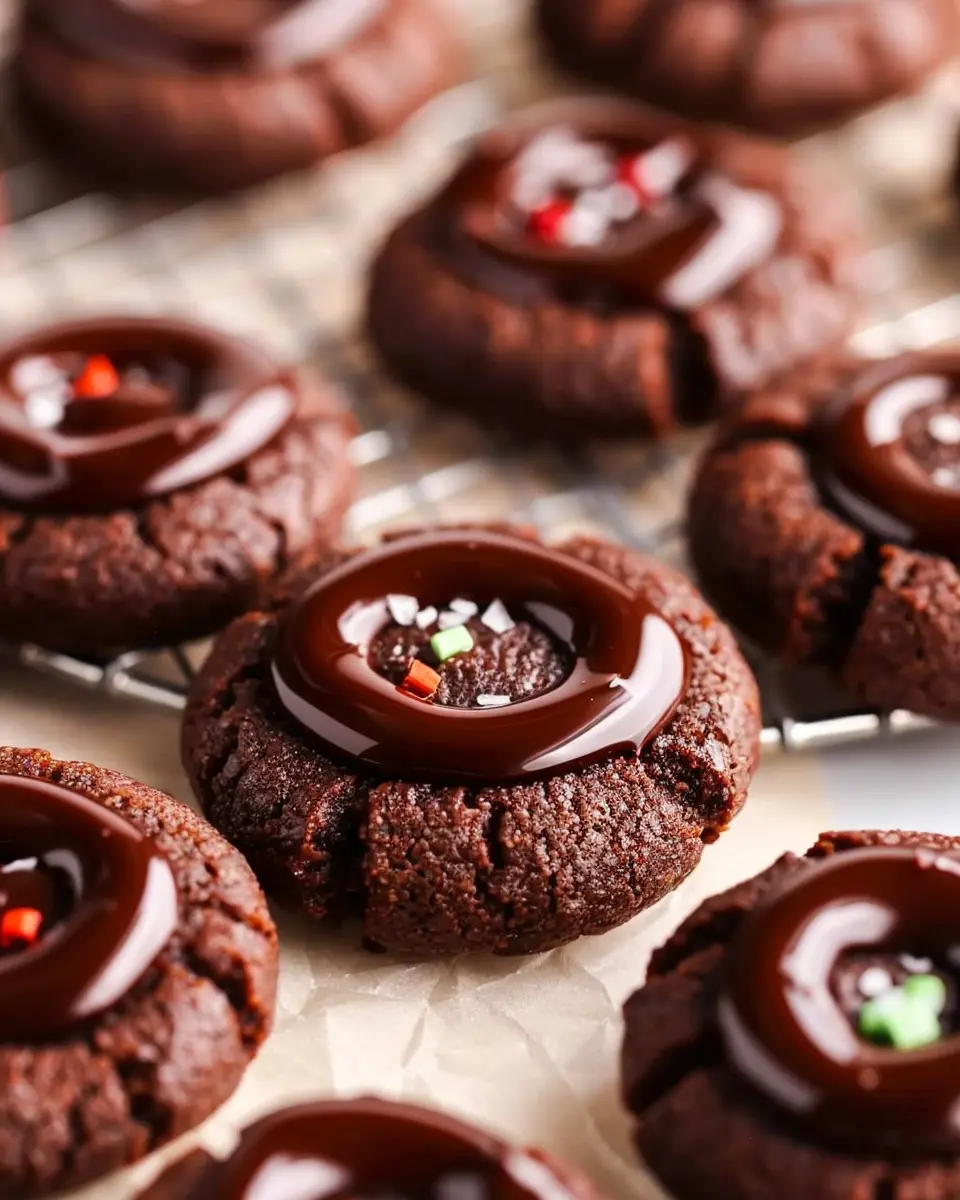
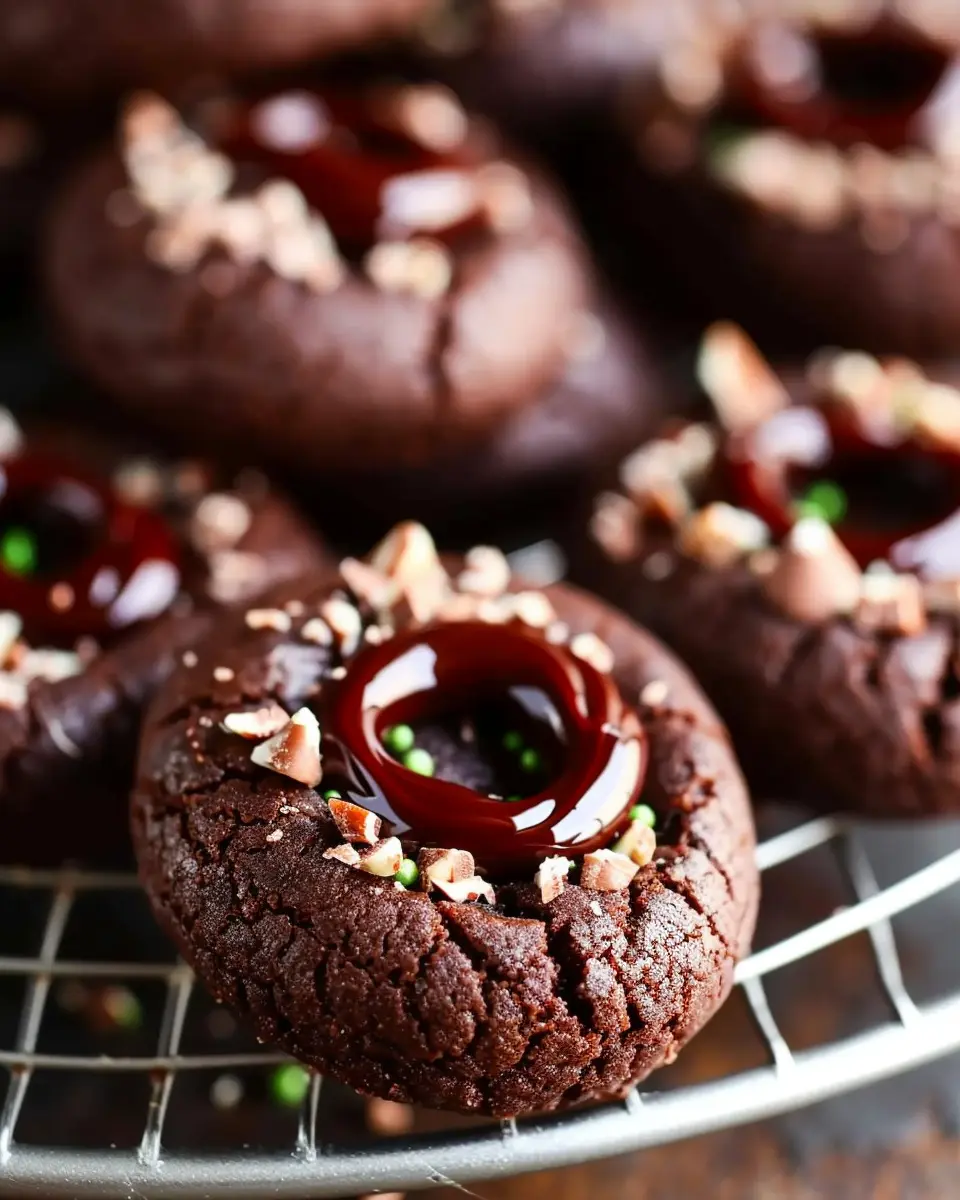
Once formed, gently press your thumb in the center of each ball to create that signature “thumbprint” indentation. This is where the chocolate ganache will later reside!
Chilling the dough
Chilling the dough is a pivotal step. Place your cookie formations on a lined baking sheet and pop them in the fridge for at least 30 minutes. This not only helps the cookies maintain their shape during baking but also enhances their flavor. It’s a waiting game, but totally worth it!
Baking the cookies
With the dough chilled, preheat your oven to 350°F (175°C). Bake the cookies for about 10-12 minutes. Your cookies are ready when the edges look set, but the centers might still appear a little soft – they will firm up as they cool.
Make sure to allow them to cool on the baking sheet for a few minutes before transferring them to a wire rack. You want them to be delicate and easy to handle.
Making the chocolate ganache
Now, onto one of the most exciting parts – the chocolate ganache! In a small saucepan over low heat, combine heavy cream and chopped dark chocolate. Stir gently until both elements meld into a smooth and glossy mixture. This would usually take about 5 minutes. If you’re using semi-sweet chocolate, the richness will balance beautifully with the cookies.
Filling the cookies
Once your cookies are cooled and your ganache is ready, it’s time to fill those thumbprints! Use a teaspoon or piping bag to fill each indentation with your luxurious chocolate ganache. You can be generous here; after all, it’s all about elevating your Chocolate Thumbprint Cookies to heavenly levels.
Let them set until the ganache firms up slightly, and voila—your delicious cookies are ready to impress your friends and family! Enjoy and don’t forget to share the love of baking.
Variations on Chocolate Thumbprint Cookies
Nutty Chocolate Thumbprint Cookies
If you’re looking to add some nutty richness to your Chocolate Thumbprint Cookies, consider incorporating your favorite nuts. Try mixing chopped pecans, walnuts, or almonds into your dough for a delightful crunch. Alternatively, sprinkle a bit of crushed hazelnuts or pistachios on top of the chocolate filling after baking to give those cookies an elevated look and taste. Not only do these additions amp up the flavor profile, but they also boost the nutritional content—nuts are a great source of healthy fats and protein.
Seasonal Flavors for Thumbprint Cookies
Embrace the changing seasons by customizing your Chocolate Thumbprint Cookies with seasonal ingredients. For a cozy autumn vibe, try adding a hint of cinnamon or nutmeg to your dough and filling them with pumpkin spice or apple butter. In the winter months, consider using peppermint essence for a refreshing twist and topping with crushed candy canes. Spring and summer can be brightened up with fruity jellies like raspberry or lemon curd, which pair beautifully with chocolate. The beauty of thumbprint cookies is their versatility; you can always switch up the filling based on what you have at home or what’s in season.
Exploring these variations not only keeps your baking exciting but also allows you to cater to diverse tastes, ensuring every cookie is a memorable treat. Whether you’re hosting a gathering or simply treating yourself, these nutty and seasonal tweaks to Chocolate Thumbprint Cookies are sure to impress. For more cookie ideas, feel free to check out this page on seasonal baking for inspiration!
Cooking Tips and Notes for Chocolate Thumbprint Cookies
Baking Chocolate Thumbprint Cookies can be a delightful experience, but a few handy tips can elevate your game. Here’s what you should know:
Proper Chilling Techniques
Chilling your cookie dough for about 30 minutes before shaping is crucial. It helps the cookies retain their shape during baking, preventing them from spreading too much.
Choose Quality Ingredients
Opt for high-quality cocoa powder and chocolate for filling. Premium products can significantly enhance the flavor, giving your cookies that rich, comforting taste every bite deserves.
Experiment with Fillings
While traditional chocolate ganache is delightful, don’t hesitate to think outside the box! Use caramel, fruit preserves, or even nut butter as your filling options. Check out this article on creative cookie fillings for inspiration.
Storage and Freshness
Store your baked cookies in an airtight container for up to a week. They also freeze well! Just layer them with parchment paper before placing them in the freezer.
These simple tips can help you master the art of baking Chocolate Thumbprint Cookies, ensuring every batch is delicious. Happy baking!
Serving suggestions for Chocolate Thumbprint Cookies
When it comes to enjoying Chocolate Thumbprint Cookies, creativity can elevate your experience! Here are some delightful serving ideas that will impress your friends or family on any occasion.
Pair with a Hot Beverage
There’s something magical about Chocolate Thumbprint Cookies and a comforting drink. Whether it’s rich hot cocoa or aromatic herbal tea, these cookies pair beautifully. The warmth of your beverage complements the fudgy chocolate, enhancing each bite.
Add Flavorful Dips
Consider serving your cookies with dips. A luscious spread of peanut butter or cream cheese frosting can take your Chocolate Thumbprint Cookies to the next level. Peanut butter adds a nutty richness, while cream cheese adds a tangy contrast that’s simply irresistible!
Create a Dessert Platter
Why not create a dessert platter for your next gathering? Mixing Chocolate Thumbprint Cookies with other sweets like fudge brownies, fruit tarts, and assorted chocolates makes for an attractive and diverse spread. Guests will enjoy choosing from a variety of treats.
Personal Touches
For a personal touch, consider adding decorative elements. A sprinkle of sea salt or drizzling melted chocolate over the tops can add a gourmet feel. Remember, presentation matters!
By incorporating these serving suggestions, you’ll create a memorable experience with your Chocolate Thumbprint Cookies. For more inspiration, check out the full guide on dessert platters. Enjoy!
Time breakdown for Chocolate Thumbprint Cookies
Preparation time
Making Chocolate Thumbprint Cookies is a breeze! You’ll need about 20 minutes to gather your ingredients and whip up the dough. This is your chance to get creative—maybe put on your favorite playlist while you mix things up!
Baking time
Once the dough is ready, baking your delightful cookies will take approximately 12–15 minutes. Keep an eye on them as they bake to ensure you achieve that perfect melt-in-your-mouth texture.
Total time
In total, you’re looking at around 35–40 minutes from start to finish. It’s a quick way to satisfy your sweet tooth or impress guests! For more tips on baking techniques, you can check out resources like King Arthur Baking for expert advice.
Nutritional facts for Chocolate Thumbprint Cookies
Understanding the nutritional profile of Chocolate Thumbprint Cookies can help you enjoy them guilt-free! Here’s a closer look:
Calories
One cookie typically contains around 100 to 120 calories. This makes it a delightful treat without completely derailing your daily intake.
Sugar
These cookies pack in about 8 to 10 grams of sugar each. While that adds sweetness, be aware of your total daily sugar consumption to keep it balanced.
Fat content
When it comes to fat, expect about 5 to 7 grams per cookie. Most of this comes from the delicious chocolate and butter, which contribute to that rich flavor we all love.
For more detailed insights, you might want to explore NutritionData or USDA’s FoodData Central for comprehensive dietary guidance. Always remember that moderation is key when indulging in sweet treats!
FAQs about Chocolate Thumbprint Cookies
Can I use different types of chocolate for the ganache?
Absolutely! One of the joys of making Chocolate Thumbprint Cookies is the creativity that comes with it. While classic ganache is made with semi-sweet chocolate, feel free to explore alternatives like dark chocolate for a richer flavor or milk chocolate for a sweeter, creamier filling. You could even mix chocolate types to achieve a perfect balance that suits your palate. Just ensure to adjust the cream-to-chocolate ratio to maintain the right consistency!
How do I store my chocolate thumbprint cookies?
To keep your Chocolate Thumbprint Cookies as fresh as possible, store them in an airtight container at room temperature. They should last about 5 to 7 days—if they last that long! If you’ve made a large batch, you can also freeze them. Just layer the cookies with parchment paper in a freezer-safe container, and they can stay good for up to three months. When you’re ready to enjoy, let them thaw at room temperature or pop them in the microwave for a few seconds.
What substitutions can I make for dietary restrictions?
No worries—there are plenty of ways to adapt Chocolate Thumbprint Cookies for various dietary needs!
- Gluten-Free: Use a gluten-free all-purpose flour blend instead of regular flour.
- Dairy-Free: Swap out the butter for a plant-based option, and choose dairy-free chocolate for the ganache.
- Vegan: To make these cookies vegan, follow the dairy-free substitutions but also replace eggs with flax eggs or unsweetened applesauce.
For lots more tips, check out resources like the American Institute for Cancer Research which offer insight on gluten-free options and other dietary needs. Happy baking!
Conclusion on Chocolate Thumbprint Cookies
Making Chocolate Thumbprint Cookies is not just about following a recipe—it’s an experience filled with fun and creativity. These cookies are wonderfully soft, boasting a rich chocolate flavor balanced by the delightful burst of your favorite jam. Perfect for celebrations, gifts, or simply indulging yourself, they are sure to impress.
Baking can be a stress reliever, and sharing these cookies with friends or family makes it even more rewarding. Plus, with adjustments, like swapping for gluten-free options or using different fillings, you can make them your own. For more tips on baking creativity, check out this resource on baking hacks. Enjoy your sweet journey into the world of Chocolate Thumbprint Cookies!
PrintChocolate Thumbprint Cookies: The Best Easy Recipe for Everyone

Learn how to make delicious Chocolate Thumbprint Cookies with this easy recipe that everyone will love.
- Prep Time: 20 minutes
- Cook Time: 12 minutes
- Total Time: 32 minutes
- Yield: 24 cookies
- Category: Dessert
- Method: Baking
- Cuisine: American
- Diet: Vegetarian
Ingredients
- 1 cup unsalted butter
- 1 cup granulated sugar
- 2 cups all-purpose flour
- 1/2 cup cocoa powder
- 1/4 teaspoon salt
- 1 teaspoon vanilla extract
- 1/2 cup chocolate chips
Instructions
- Preheat your oven to 350°F (175°C).
- In a bowl, cream together the butter and sugar until fluffy.
- Mix in the flour, cocoa powder, and salt until combined.
- Stir in vanilla extract and chocolate chips.
- Roll the dough into small balls and place them on a baking sheet.
- Make a thumbprint in the center of each ball.
- Bake for 10-12 minutes, then let cool.
Notes
- For extra flavor, add a pinch of espresso powder to the dough.
- Make sure to chill the dough for 30 minutes for better shaping.
Nutrition
- Serving Size: 1 cookie
- Calories: 120
- Sugar: 12g
- Sodium: 50mg
- Fat: 8g
- Saturated Fat: 5g
- Unsaturated Fat: 3g
- Trans Fat: 0g
- Carbohydrates: 15g
- Fiber: 1g
- Protein: 2g
- Cholesterol: 30mg


")