

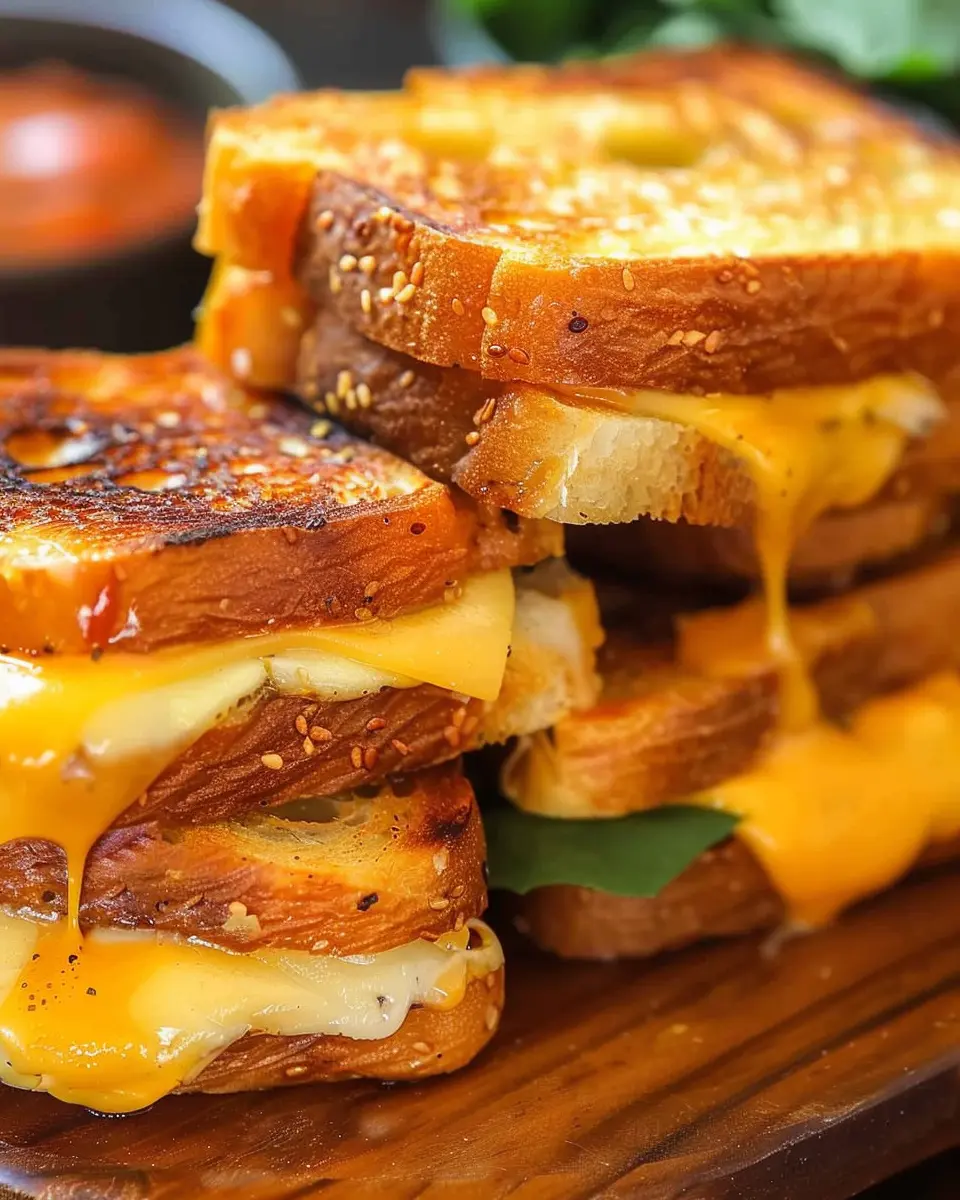
Introduction to Grilled Cheese Sliders
Grilled cheese sliders made with Hawaiian rolls are more than just a meal; they’re a delightful blend of nostalgia and modern comfort food, perfect for any occasion. Whether you’re hosting a casual dinner with friends or enjoying a cozy night in, these little sandwiches pack a flavorful punch. What’s great about grilled cheese sliders is their versatility; you can customize them to suit your taste preferences or pantry staples.
Why Grilled Cheese Sliders are a Perfect Dinner Choice
Imagine biting into a warm, gooey cheese-filled slider that practically melts in your mouth. The soft, sweet Hawaiian rolls complement the savory cheese and protein, creating an irresistible flavor combination. Not only are they scrumptious, but they’re also incredibly easy to make, making them an ideal choice for busy professionals who still want to enjoy a homemade meal.
Here are a few reasons why you should consider making grilled cheese sliders for dinner:
- Quick and Easy: With just a few ingredients, including your favorite cheese, Turkey bacon, or Chicken ham, you can whip up these delightful sliders in under 30 minutes. Perfect for those weeknights when time is short!
- Customizable: Whether you’re a cheese lover or someone who’s into savory toppings, there are endless combinations to keep your taste buds excited. Try adding fresh herbs or spices for an extra kick.
- Shareable: These sliders are perfect for gatherings. They’re easy to serve, and guests can enjoy them in just a couple of bites. Who doesn’t love finger foods?
- Kid-Friendly: If you’re cooking for a family, these sliders are sure to please even the pickiest eaters. Plus, involving kids in the preparation can be a fun bonding experience.
For additional tips on crafting the perfect grilled cheese, you can check out America’s Test Kitchen. Now that we’ve set the stage, let’s dive into the delicious world of grilled cheese sliders and see how you can make them your own!

Ingredients for Grilled Cheese Sliders
When it comes to making delicious grilled cheese sliders, you’ll want to gather the right ingredients for a mouthwatering experience. These sliders are perfect for weeknight dinners, game days, or when you’re simply craving comfort food. Here’s what you’ll need:
- Hawaiian Rolls: The star of the show! Their soft, slightly sweet flavor complements the cheese beautifully.
- Cheese: Go for a classic like cheddar or mix it up with a blend of mozzarella and gouda for a melty delight.
- Turkey Bacon: For that satisfying crunch. It adds a savory depth to your sliders—lightly crispy is best!
- Chicken Ham: This offers a delicious twist; it’s great for adding a bit of heartiness to the sliders.
- Butter: You’ll need this for grilling. It adds golden color and a rich flavor.
- Garlic Powder: A sprinkle of this elevates the taste, giving your sliders an irresistible aroma.
- Served with dipping sauce: Try marinara or a zesty aioli for extra flavor.
With these simple ingredients, your grilled cheese sliders are bound to be a hit! Whether you’re enjoying them solo or sharing with friends, you can’t go wrong. Feel free to read more about the role of strong flavors in comfort food here. Happy grilling!
Step-by-Step Preparation for Grilled Cheese Sliders
Grilled cheese sliders are a surprisingly simple yet delightful treat that can elevate any gathering. Whether you’re hosting a game night, planning a cozy movie marathon, or just indulging in a late-night snack, these delicious bites are sure to impress. Let’s delve into the preparation steps so you can whip up your own grilled cheese sliders using Hawaiian rolls!
Gather Your Ingredients
Before diving into this cheesy adventure, it’s essential to have everything you need on hand. Here’s a quick list to get you started:
- Hawaiian rolls: The sweet and soft foundation for your sliders.
- Cheese: Use your favorites, but classic combinations like sharp cheddar and creamy mozzarella work wonderfully.
- Turkey bacon or chicken ham: Adds a savory twist to each slider.
- Butter: For that golden, crispy finish.
- Optional additions: Sliced tomatoes, fresh spinach, or even a hint of mustard can elevate the flavor.
Preheat the Oven
Now that you have your ingredients gathered, it’s time to prepare your cooking environment. Preheat your oven to 350°F (175°C). A properly heated oven will ensure your sliders cook evenly and develop that irresistible melty cheese texture. If you’re looking for precision, a reliable oven thermometer can be a great investment to ensure accuracy.
Prepare the Hawaiian Rolls
Next up, let’s focus on the star of the show: the Hawaiian rolls. Carefully slice the entire set of rolls in half horizontally. Be gentle to keep them intact, as they will hold your fillings well. Once you have two halves, you’re ready to add your delicious ingredients!
Butter Those Rolls!
A key component of a fantastic grilled cheese slider is that crispy, buttery exterior. Melt some butter and brush it generously on the cut sides of both the top and bottom rolls. This will help achieve that golden-brown perfection when they bake. Trust me; it’s a small step that makes a colossal difference!
Layer the Cheese
Now we get to the fun part! Start by layering cheese on the bottom half of the rolls. Feel free to mix and match your cheese varieties here. Next, add your choice of turkey bacon or chicken ham for that added flavor and a little crunch. If you’re feeling adventurous, throw in some veggies for a fresh element!
Assemble and Brush with Butter
Once your delicious fillings are in place, place the top halves back on each slider. Brush the tops lightly with more melted butter. This final touch ensures a crisp and irresistible finish. Arrange the sliders snugly in a baking dish, and if you like, season them with a sprinkle of garlic powder or herbs for an extra kick.
Bake to Perfection
Finally, it’s time to let your grilled cheese sliders bake in the oven. Pop them in the preheated oven and set a timer for 15-20 minutes. Keep an eye on them, as cooking times may vary based on your oven. You’re looking for that gorgeous golden color and melty cheese joy. Once done, let them cool for a few moments before digging in!
With these simple steps, you’ll have baked delicious grilled cheese sliders using Hawaiian rolls that will surely be the hit of any gathering. So gather some friends, grab your favorite dipping sauce, and enjoy the wonders of cheesy goodness. Happy cooking!
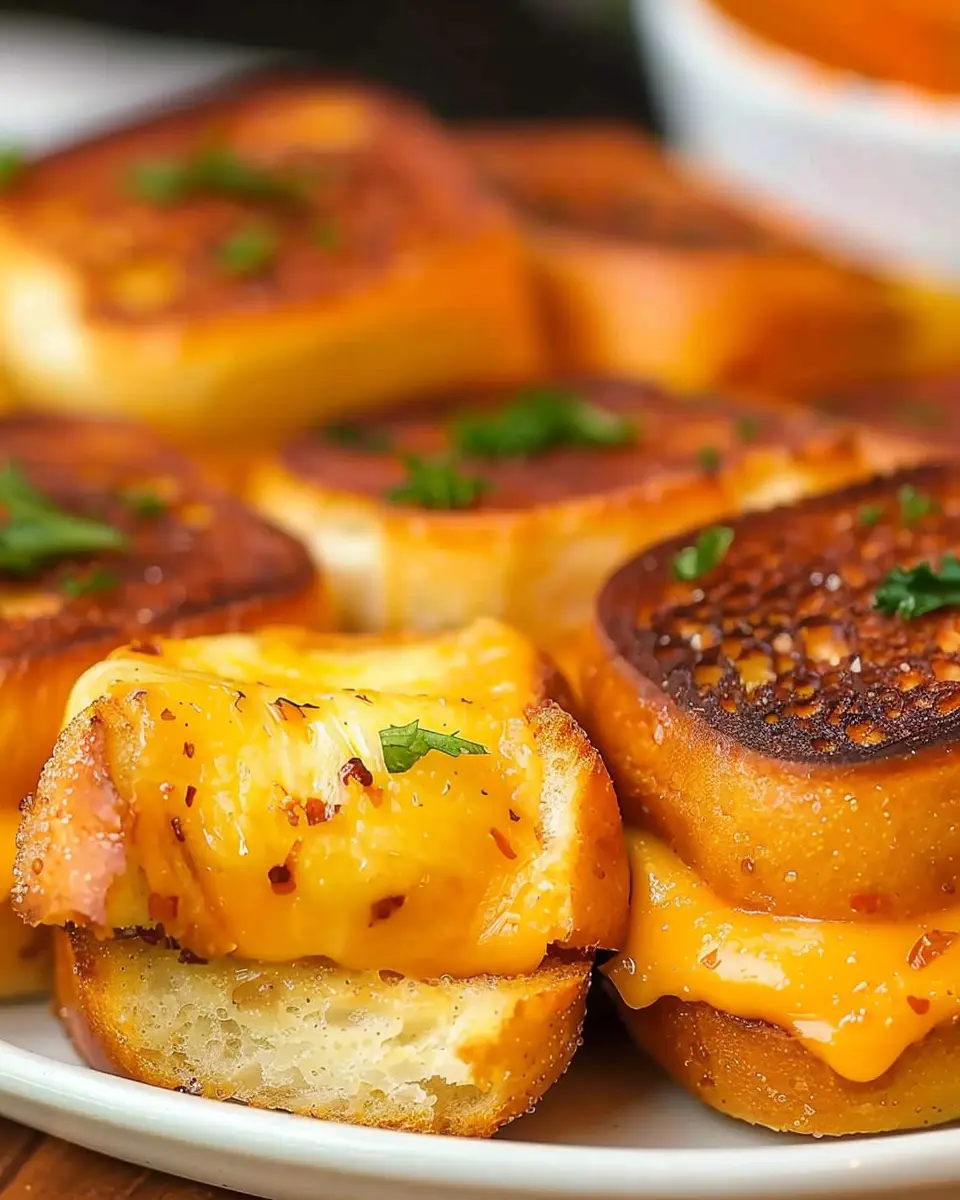
Variations on Grilled Cheese Sliders
Grilled cheese sliders are an irresistible twist on a classic favorite, especially when you use soft Hawaiian rolls. These mini sandwiches are not only great for gatherings but also versatile enough to satisfy different taste buds. Let’s explore some delicious variations!
Turkey Bacon and Cheese Sliders
For those who love a bit of crunch with their cheese, consider adding Turkey Bacon. Start by layering your favorite cheese—think sharp cheddar or melty mozzarella—on a Hawaiian roll, and then add crispy turkey bacon. The combination of rich, cheesy goodness and savory Turkey Bacon is sure to delight. Serve them alongside a zesty dipping sauce like mustard or a spicy aioli for an extra kick.
Chicken Ham and Cheese Sliders
Switching it up with Chicken Ham creates a flavor profile that’s subtly savory and oh-so-satisfying. Stack slices of chicken ham with your choice of cheese, perhaps Swiss or gouda, to complement the flavors perfectly. Try adding fresh arugula or spinach for a touch of greenery and freshness. These sliders are fantastic for a quick lunch or a cozy dinner, especially when paired with a side of crunchy pickle spears.
Veggie and Cheese Sliders
For a meat-free option, veggie lovers will fall head over heels for Veggie and Cheese Sliders! Simply layer assorted grilled vegetables like zucchini, bell peppers, and mushrooms with slices of cheese. Experiment with herbs like basil or rosemary to elevate the flavors. These sliders are packed with savory goodness and can be enjoyed guilt-free, making them a crowd-pleaser at any gathering.
Each of these variations brings something unique to the table, proving that grilled cheese sliders are more than just a delicious snack—they’re a canvas for creativity. For more inspiration, check out Food Network for ideas on dipping sauces or side pairings!
Cooking Tips and Notes for Grilled Cheese Sliders
Choosing the Right Cheese
When making grilled cheese sliders, cheese selection is key! Opt for a melty option like sharp cheddar, fontina, or even a blend of cheeses for complexity. Combining flavors can elevate your sliders. If you’re feeding a crowd, try using a mix for a delightful experience. Remember, the cheese should melt smoothly without overwhelming the other ingredients.
Baking Tips for Golden Perfection
To achieve that perfect golden crust, brush the tops of the sliders with a mix of melted butter and garlic powder before baking. The butter not only adds flavor but also enhances color. Bake at 350°F (175°C) for about 15-20 minutes, or until the sliders are golden and the cheese is gooey. If you prefer a deeper crunch, pop them under the broiler for an additional 1-2 minutes—just keep an eye on them!
For more guidance, check out Serious Eats for extensive cheese resources or visit Bon Appétit for baking tips and tricks. Enjoy your grilled cheese sliders!
Serving Suggestions for Grilled Cheese Sliders
Perfect Pairings with Dips
When it comes to grilled cheese sliders, dips can elevate your snacking experience to a whole new level. Try pairing your sliders with:
- Creamy Tomato Soup: A classic combination that never disappoints. The acidity of the soup perfectly complements the richness of the cheese.
- Avocado Ranch Dip: This fresh, zesty dip adds a delightful twist. The creamy avocado balances the savory flavors of the sliders.
- Spicy Mustard: For those who enjoy a kick, a side of spicy mustard can add a nice bite, enhancing the overall taste.
Side Dish Suggestions
No meal is complete without a few thoughtful side dishes. Here are some suggestions that work beautifully with your grilled cheese sliders:
- Sweet Potato Fries: Baked or air-fried, they bring a touch of sweetness and a crunchy texture that contrasts nicely with the sliders.
- Pickle Chips: These add a refreshing crunch and tangy flavor, cutting through the richness of the cheese.
- Coleslaw: A light, tangy coleslaw can provide a nice balance, making your meal feel more complete.
Give these combos a try for your next gathering, and watch everyone come back for seconds! For more creative ideas, be sure to check out Food Network or BBC Good Food.
Time Breakdown for Grilled Cheese Sliders
Preparation Time
Getting your ingredients ready for these grilled cheese sliders will take about 10-15 minutes. You’ll slice the delicious Hawaiian rolls, gather your favorite cheeses, and add in that savory turkey bacon or chicken ham. If you’re looking to crisp up the flavors, a little pre-cooking on the turkey bacon is a great idea!
Baking Time
Once you’ve assembled your sliders, it’s time to pop them into the oven. Baking should take around 20-25 minutes, just enough time to melt that cheese perfectly and create a golden crust.
Total Time
In total, you’re looking at about 30-40 minutes to enjoy your scrumptious grilled cheese sliders. This is an ideal recipe for busy young professionals who want a quick but satisfying meal. Want to level up your snack game? Check out this guide on how to customize your sliders for even more delicious ideas!
Nutritional Facts for Grilled Cheese Sliders
When whipping up delectable grilled cheese sliders using Hawaiian rolls, it’s not just about the taste; understanding the nutritional profile can really help balance your meal. Here’s a quick look:
Calories
Each slider typically contains around 250-300 calories, making it a tempting choice for a satisfying snack or casual meal without going overboard.
Protein
With gooey cheese and hearty fillings, these sliders pack a punch with approximately 12-15 grams of protein per serving. This can help keep you full and energized!
Sodium
Like any cheesy treat, be aware of the sodium content, which ranges from 400-600 mg depending on the cheese and any added meats. Keeping an eye on your sodium intake is key, especially if you’re aiming for a healthier lifestyle.
For more details about balanced diets, check out resources from reliable sources like the Mayo Clinic or Nutrition.gov. Enjoy your sliders while being mindful of what you consume!
FAQs about Grilled Cheese Sliders
Can I make these sliders ahead of time?
Absolutely! You can prepare the grilled cheese sliders ahead and store them in the fridge before baking. Just assemble your sliders, cover them with foil, and keep them in the refrigerator for up to 24 hours. When you’re ready to serve, pop them in the oven, covered, to heat them through and melt the cheese—perfect for a party or quick weeknight meal. For more make-ahead meal tips, check out this helpful guide.
What are some good cheese combinations?
The beauty of grilled cheese sliders lies in their versatility! You can experiment with different cheese combinations to find your favorite pairing. Here are some delicious suggestions:
- Classic: Cheddar and Mozzarella for that gooey stretch.
- Gourmet Delight: Gruyère with a hint of Swiss for a nutty flavor.
- Spicy Twist: Pepper Jack combined with a creamy Havarti for a kick.
- Sweet & Savory: Fontina with a hint of goat cheese for something unique.
Feel free to mix and match! The right cheese can elevate your sliders from simple to spectacular.
How do I store leftovers?
If you’re lucky enough to have grilled cheese sliders leftovers, storing them is simple. Allow them to cool completely, then place them in an airtight container. They can last for about 2-3 days in the fridge. To reheat, just pop them back in the oven or a toaster oven, covered with foil, for a couple of minutes until warmed through. Enjoy your sliders at a later date without sacrificing taste!
These tips should make your grilled cheese slider experience seamless and enjoyable. If you have any other questions, feel free to drop them in the comments!
Conclusion on Grilled Cheese Sliders
In closing, grilled cheese sliders are not just a snack; they’re a delightful experience that can elevate any gathering. Their ooey-gooey cheese and buttery Hawaiian rolls create a perfect combination that appeals to both the young and young-at-heart. Whether you opt for classic cheese or add layers of Turkey Bacon and Chicken Ham, the versatility allows for endless creativity.
These sliders are easy to prepare and offer a nostalgic comfort that will surely impress your friends. Pair them with a refreshing side salad or crispy veggie sticks (check out this healthy salad recipe for ideas) to balance the richness. Enjoy your sliders!
PrintGrilled Cheese Sliders: Indulgent Treats with Hawaiian Rolls

Delicious and easy to make, these grilled cheese sliders are perfect for a party or a fun family dinner. Using soft and sweet Hawaiian rolls, they are sure to delight everyone.
- Prep Time: 10 minutes
- Cook Time: 20 minutes
- Total Time: 30 minutes
- Yield: 12 sliders
- Category: Appetizers
- Method: Baking
- Cuisine: American
- Diet: Vegetarian
Ingredients
- 12 Hawaiian rolls
- 1 cup shredded cheddar cheese
- 1 cup shredded mozzarella cheese
- 1/2 cup butter, melted
- 1 teaspoon garlic powder
- 1/2 teaspoon salt
- 1/4 teaspoon black pepper
Instructions
- Preheat the oven to 350°F (175°C).
- In a bowl, mix the melted butter, garlic powder, salt, and pepper.
- Slice the Hawaiian rolls in half horizontally.
- Brush the inside of the rolls with the butter mixture.
- Layer the cheddar and mozzarella cheese on the bottom half of the rolls.
- Replace the top half of the rolls and brush the tops with the remaining butter mixture.
- Wrap the sliders in aluminum foil and bake for 15 minutes.
- Unwrap and bake for an additional 5 minutes until golden brown.
- Remove from the oven, let cool slightly, and serve warm.
Notes
- Feel free to add your favorite ingredients like bacon or tomatoes for an extra twist.
- These sliders can be made ahead of time and baked just before serving.
Nutrition
- Serving Size: 1 slider
- Calories: 180
- Sugar: 2g
- Sodium: 410mg
- Fat: 10g
- Saturated Fat: 5g
- Unsaturated Fat: 4g
- Trans Fat: 0g
- Carbohydrates: 18g
- Fiber: 1g
- Protein: 7g
- Cholesterol: 20mg


")